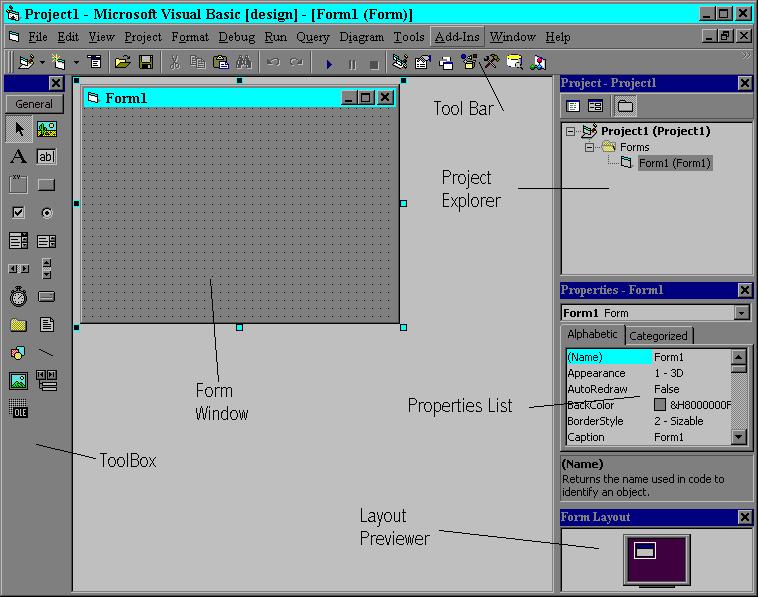
One of the first steps to programing is learning the compiler interface. Open a new project and take a look at the differnet windows. The Toolbox (on the left) holds all the controls you will use on your forms. The Properties List (on the right, in the middle) is used to change the settings of your controls. The Project Explorer (on the right, at the top) shows all the forms being used. Last but very important, the Form window, this is where you design your program interface. (we'll talk about the code window in a little bit.)
Now that you know your way around lets get down to business! Click once on the form to select it and then take a look at the properties list (if you double click it, the code window will pop-up. if this happens just close the code window for right now). At the top of the list you'll see "(Name)", this used in code to talk to the form. Lets change the name of our form. From "Form1" to a more meaningful name like "frmTutorial". We add "frm" to Form controls and then make the first letter in each word uppercase (this format is used by programers to help them remember what controls the code is useing.) Now when we get to coding we'll use frmTutorial to refer to this form.
Moving on, the Caption property is another useful setting. It sets the text displyed in an objects title bar. Lets change this to "My Visual Basic Program". Now at the top of your form it will say My Visual Basic Program. Lets add a control to our form. Click the label box control on the Toolbox. (To find out what the controls are what just set your mouse over top of one and read the pop-up help.) Now that you have the label box selected click and drag a small box on to the form. You can also place controls on a form by double clicking them in the toolbox, this method will place the control in the center of your form. Once your label box is drawen, lets work with it! Lets change the name to something meaningful. Lets call this control "lblLession1", notice the "lbl" in front of Lession1. Like how frm is for forms, lbl is for label boxs. We'll teach you each controls prefixs in Tutorial 5. Now, the label box still says "label1" on the screen, lets change that too. Go to the caption property of the label box and type "Lession one is really dumb lets learn some code!". Depending on how big you made your label box, you may not see all the words, and they might have wrapped to the next line. We can fix this two ways, 1) We can change the "AutoSize" property to true, or 2) Just click and drag the sizing handles around the label box. #1 will put the text on to one line and #2 will change the way you make it change. Once you get the text the way you wnat it, lets change the font.
Click the font property and then click the "..." button. A new window appears and you can edit the font.
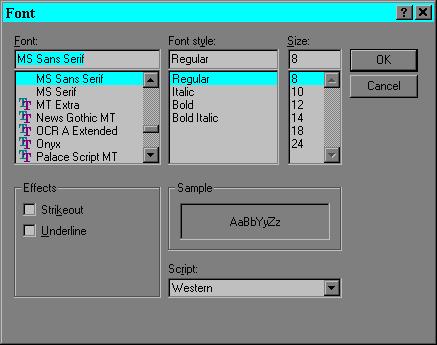
Change the font to Arial, make it bold, and change the size to 12. Now the text is longer then the form! We can fix this by clicking on the form and draging the sizing handles (You may have to resize the Form Window also).
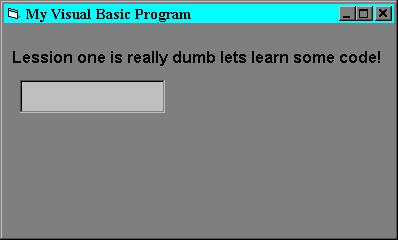
Just like the label control, lets add a text box. Text boxes are used to get user input or display something to the user. Once your text box is on the form change the name to "txtInput" (txt is the prefix for Text Boxs). Notice there is no caption for this control but the box says text1. So what do we do? Look in the properties windows for the Text setting. unlike forms and labels a text box's content is put into the text property not the caption. Delete the "text1" in the text property. Now you should have a blank text box named txtInput and your label named lblLession1. It should look something like:
Now that we got a few things on our form lets make them do something. But first we need to add a Command Button. Do this the same way as a label or a text box. Now we need to change the name and caption. Lets name it cmdButton (cmd is the prefix for Command Buttons), and change the caption to "I Like VB". Now we can make it do something! Double click the command button, this will bring up the code window (The code window is where we will make the program process information. Under the "Private Sub cmdButton_Click()" type: "lbllession1.caption = txtinput.text" and press return. Notice I did not type any capital letters. When you hit return the compiler will change it to what you put in the Name property of each control. It should now read "lblLession1.Caption = txtInput.Text" You may have seen how after you type "." following a control a drop down list appears. This can be very useful and time saving. You can type in the first few letters until Visual Basic selects the command you want from the list and then hit Tab and the compiler will put that word in your code. Just try this feature a few times and you'll see how much time and typing it can save.
Your code should look like:
Private Sub cmdButton_Click()
lblLession1.Caption = txtInput.Text
End Sub
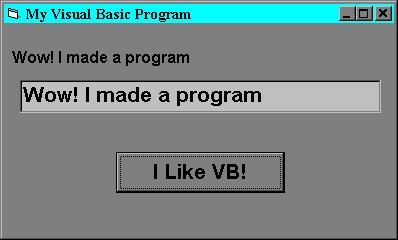
Now that you have the code ready lets run the program! To run a program hit F5, or click the Start icon on the toolbar. You can also go to the menu Run, and pick Start. Your program will pop-up and wait for you to input some information. Put something in the text box. Lets enter: "Wow! I made a Program" now click the Command button.
So you understand how text boxs and labels can work together. Now lets put a spin on things. The VAL function, it's used to return only numbers. It is a very useful tool. Lets see how it works. In the code window change: "lblLession1.Caption = txtInput.Text" to "lblLession1.Caption = val(txtInput.Text)". Now lblLession1 will only show numbers when you hit the command button. Lets test this new function out. Run the program and enter "123" in the text box and hit the button. Now try "12X3", what happened? Where did the 3 go? Using Val will show numbers until it hits something differnet. Try A123, it will return 0! Because 0 numbers were found.
since your form only shows numbers lets dress them up a little. The basic formating functions include:
Private Sub cmdButton_Click()
lbllession1.caption = format(val(txtinput.text), "Standard")
End Sub
Notice how we just added "format(" and ", "standard")" around our Val function. Now run the program and enter "12345.678". Test some numbers and try changing the "Standard" to fixed and currency. Once your done we can move on!