Anyone can put controls on to a form and call it a program. We hope by the end of this tutorial you will inderstand some standards and know how to make your program look great. We have already showed you how to drag a control to the size you wish and how when you doulbe click a control it is placed in the middle of our form. If you're lost at this point maybe you should go back and read Tutorial 1 for a basic understanding about what we're covering here. Lets talk about some standards to think about when your designing your forms. Try to keep it simple, command buttons group with other command buttons and text boxes with text boxes. Keep the size basically the same also. Before you even write the code for your porgram take a look at your interface. Is it easy to follow? Do you understand what is need to be inputed by the user? Will the user understand it and know what to do? The last one is the most important. Try having someone else look at your program and tell you what they think. Now lets look at a few examples:
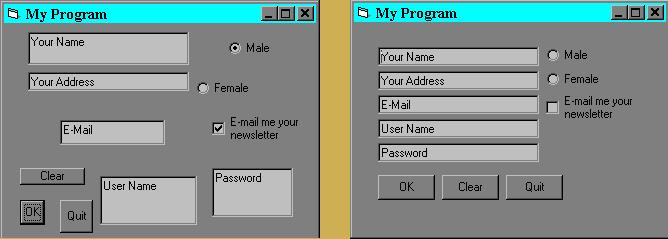
The form on the left is hard to follow and looks very bad. The controls are differnet sizes and all over the form. The form on the right looks good and is easy to follow. The buttons are in line and all the same size, and the same for the text boxes. When a user looks at your program you don't want fell lost or confussed. We can add features to our programs to stop this problem. One thing we can do is adding "tool tips". We do this by selecting a control, and under the properties window click ToolTipText. Now enter what you want to pop-up when the user put the mouse over that control. We can also add labels to our form to inform the user on what to do. Now lets make our program look even better!
How you place your controls can make or break your program when you show it to the common user. They don't care it took you two weeks and a hundred lines of code just to make it user frinedly and to put in all the bells and whistles. All they care is that it is user friendly with all the extras they want! Lets take that good looking form showen above and make it better. By adding some labels and frames your program could look like:

The form didn't look that bad to start with, but with labels and frames it now looks so much better! Lets talk about Frames in Tutorial 5: Controls. I just wanted to show an example here. Form layout is important but you should feel free to use your own style when designing. Just remember if your making the program for some one else to use keep their style in mind.
Making the user happy with the looks of your program is the first step to make a great form. The next part is adding features that make your form easy to use. Lets say the user doesn't have a mouse to point and click around the form. We need to add "Access Keys".If we added a command button named "cmdButton" with a caption of "&Change". Notice the & sign in the caption. When you look on the form the C in Change will be underlined. This is an access key. If a user hits Alt + C the Buttons event will be processed. Keep in mind no access keys can be the same letter on one form. You should already know that text boxes don't have caption properties. So how do we add access keys to them? We need to place a label control by the text box and change the "TabIndex" of the label and the text box. The Tab Index is used to tell the form which control gets the focus when the user presses the tab key. By default your compiler will but the index in the order by which you added your controls. Another useful thing we can add is a "Default Button". In a command buttons properties you can set the "Default" to true. This will make that buttons events trigger when you press Enter. One of the more harder features to add is, Selecting the text already in a text so it will automatically delete when the user starts to type. We will cover that in Tutorial 10: String Manipulation.
Input boxes are used to prompt the user for a string of information. It might be a name, a password, or maybe some value. Input boxes make it easy to get information from the user with out designing another form. Lets make a simple program that prompts the user for their name and then shows them a little message on our form. Start by opening the form_load event of a form and Dim a string variable named strInput. Now we can make an Input box and put the user respones in to our variable. type: strInput = InputBox("Enter Your Name", "Name"). Inputbox() is a built in function for VB. Notice how we put " " around our strings of text. The first string is what the prompt will say, and the second string is the Title of the input box. Now what ever the user types in the input box we will put it in strInput. Add a label to your Form. Make it the whole form for right now. Name it lblMsg and clear the caption. Now back in the code window, under the Input box add lblmsg.Caption = "Welcome " & strInput & ", I hope you like VB!". What we did here was, changed lblMsg's caption to Welcome What_The_User_Inputs , I hope you like VB!. We used the & symbol to concatinate the strings of text and our variable into one line. When you run the programit will look like this:
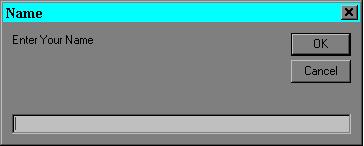
Now lets enter some data in the box. Enter your Name and click OK.

Wasn't that easy? Now that you know the basic input box function you'll better understand message boxes.
Message boxes are alot like Input Boxes. Expect the only data you can get from the user is what button they pressed on the message box. Lets take the form with the input box we just created and add to it. Add a command button named cmdExit and set the caption to "E&xit". When the user clicks the exit button we will ask them if they really want to exit or not. To do this we will add a message box in the cmdExit event. First must add a variable to use to see what button the user clicks. Dim intClick as integer. Now we'll use intClick in our message box just like strName was used in our input box. Type intclick=msgbox("Do you really want to Exit?",vbYesNo,"Exit") Like the input box the first string is the prompt. But what is vbYesNo? That is what kind of message box we want. One with a Yes and a No buuton. We'll show you the other types in a little bit. The Third string is the title of the box. So now when the user clicks the exit button a message box will pop-up and thye can click yes or no. But we didn't tell it what to do when they click one yet! We'll need to make an If statment to handle this input. (We'll cover If statments more in Tutorial 4 but just follow me for right now) Type the following code in your cmdExit event:
Dim intClick As Integer
intClick = MsgBox("Do you really want to Exit?", vbYesNo, "Exit")
If intClick = 6 Then
Me.Hide
Unload Me
End
End If
To understand this a little better you must know that 6 is the number returned to intclick if the user clicked yes, and "me" is a preset variable in VB to refer to the form. Me.Hide is a command to take the form off the screen and Unload Me will take it out of memory, and end will stop the program. Now that you understand all the commands all the if statment did was "If the user clicks yes then hide the form, take it out of memory, and end the program". If the user clicked No the If statment does nothing and the program still runs. To understand more about message boxes read our More Message Box Functions page.
By now you should understand how to make a great looking form. You should also understand the Input and message box functions. Make sure you can use all the information used in this tutorial before starting the next one. We will be talking about If and Case statments next. We will be using Message boxes and you will be expected to understand what they do. If you're ready, lets start Tutorial 4: If & Case Statments.