Home | News | Tutorials | Visual Basic | HTML | About Us | Contact Us | Links
Tutorial 8: | Tutorial 9: Printing | Tutorial 10: | More...
In this lession we'll cover the following topics:
Top
One of the most basic ways of printing information is to place the data directly on the form. This works the same way as a label or text box. You simply assign the text to the control. Ex. label1.caption = "Some Text". If you were to use the forms caption property all you would do is change the title bars text, and thats not what we want! To print text on to the form we use Form1.Print "Some Text". You can print your form out from a printer by useing Print Form1. It will print out everything that is visiable on form1. If you are going to use this command, you may want to set your forms background color to white and set the visable property of any controls you don't want printed to false. This is very basic and can be hard to make your output look right.
Top
Printing text to the default printer is easy! But before we do an example lets go over some basic syntax:
- Printer.Font - Tells you what type of font the printer is useing
- Printer.FontSize - Tells you what size font will be printed
- Printer.Print - Takes a string and sends it to the printers memory
- Printer.EndDoc - Tells the printer to print what is in memory
- Tab(n) - Moves print head to column n
- Char(n) - Moves print head n spaces
- ; - Holds the print head at it's current location
If you don't understand something above don't worry it'll be used in the example below to help you out. Lets make a simple text document. We can use printer.print "some text" to output "some text" to our printer. This will be printed in what ever font and size the printer was last set to. We can change this with the .font and .fontsize properties. One thing you should always remember when changing this is to save the old settings first so that you can put them back when your document is done printing.
Dim strFont as String           'For old font
Dim intSize as Integer          'For old size
strFont = Printer.Font          'Hold old font
intSize = Printer.fontSize      'Hold old size
Printer.Font = "Courier"        'Set new font
Printer.FontSize = 12           'Set new size
Printer.Print "Some Text"       'Print our text
Printer.EndDoc                  'Prints the documnet
Printer.Font = strFont          'Set the font back
Printer.FontSize = intSize      'Set the size back
This is the basic outline of any document printed with Printer.Print. Something to keep in mind is what type of font you use. Courier is a Block Type font, meaning all letters take the same amount of space. Ex. I takes up the same space as W. many other fonts don't do this and it can make setting up your document hell! I personally always use Block fonts, but thats just me. For the following we'll assume you are useing Courier size 12. With this font and size there are 80 columns on one line. This is important to know.
When we use the Tab() function The print head will move to that column. If the print head is already past that column it will move to the next line and to that column. Ex. if the print head is column 50 and we say tab(45) the print head will move to the next line to column 45. Tabing can make your document look really good if used right.
The Char() function moves the print head a number of spaces on a line. if the print head reachs the end it will go to the next line for the rest of the spaces. if the print head is on column 75 and we say char(10) the print head will move to column 5 of the next line (since there is only 80 columns in one line).
The ; is very important when printering. It tells the print head to hold it's current location. Lets look at a small example:
printer.print "This is a "
printer.print "text document"

will output:

This is a
text document

But if we add a ; after the first line:

printer.print "This is a " ;
printer.print "text document"

will output:

This is a text document
The effects of the ; can change your output greatly. Don't forget to use a ; after your tab and char functions as well. (Whats the point of tabing to a column and then moving to the start of the next line?)
Top
This assumes that you are familiar with the Data Environment and already have one created in your project. To learn about Data Environments read this.
Let get started! Open a project and go to Components. Click on the Designer tab and check Data Report. Now go to Project on the menu bar and select Add Data Report. Your new report can be found in the project explorer under Designers. Lets look at some of the properties of a report:
- (Name) - This is the name of the object.
- Caption - What appears in the title bar of the data report at runtime.
- DataMember - Object in Data Environment you wish to populate report with.
- DataSource - Data Environment you wish to use.
- StartUpPosition - Where you want the form to show up on the screen
- WindowState - How you want the report to be sized. Maximized, Minimized, etc.
You can set the name, caption, startup and state to what ever you want. The basic name of a report has the prefix rpt, like command button has cmd. This is not required but is look at as "good programing". Lets set up our information for this report. Set the DataSource to your Data Environment, then select the DataMember to fill your report. If you're lost at this point please read the Data Environment page, it should help you out. Now your ready to design your report!
Lets look at the DataReport Tool Bar:

Now lets look as the DataReport Layout:

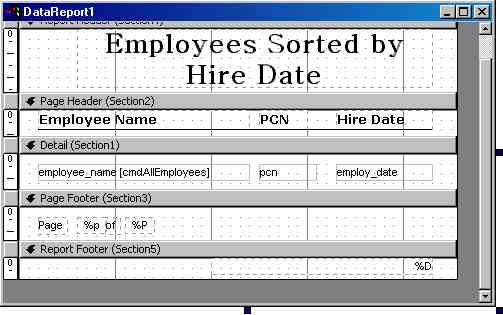
- Report Header - What is displayed at the top of the report
- Page Header - What is displayed at the top of each page of the report
- Detail - This is the detail line for the data
- Page Footer - What is displayed at the bottom of each page of the report
- Report Footer - What is displayed at the end of the report
On the Data Environment Page we created some objects. We are now going to use an object to build our report. The easiest way to design your report is to close all the windows inside VB except for the Data Environment and your DataReport. Go to Window on the menu bar and select Tile Horizontally. Now you can drag and drop fields from the DataE to the report. Remember to put the fields into the Detail section. A nice feature of this is Drag and Drop Captions, Go to options on the data environment toolbar and un/check the drag and drop captions box near of the bottom of the field mapping tab to turn this off or on.
Adding Headers is easy. Use the label control to do this. It works the same as the standard label. If you want to add page numbers set the caption of a label to %p for current page number and %P for total pages. You can add functions too, draw a function on the form then set the data member to an object to count the number of this object on the report use the functionType 4 - RptFuncRCnt. Try the different function types to see what they do.
You may be asking, So I made this report thing how do I use it? Thats simply! When ever you wish to show the report, maybe in a command button click event, just add ReportName.show. You see that it works the same way as a form.
A sample of this report may look like:
If the report pulls a lot of information it may take a while to load. Thats it! Our report is complete! Was the easy or what?
Top
You should now be able to print with VB 3 different ways. You should also understand the systax of useing the printer object and Data Reports.